


This post explains step-by-step how to create a custom User model in Django.
Objectives
By the end of this article, you should be able to:
Describe the difference between
AbstractUserandAbstractBaseUserExplain why you should set up a custom User model when starting a new Django project
Start a new Django project with a custom User model
Adding Custom fields like avatar, MobileNo fields
Practice test-first development while implementing a custom User model
AbstractUser vs AbstractBaseUser
Django documentation says that AbstractUser provides the full implementation of the default User as an abstract model, which means you will get the complete fields which come with the User model plus the fields that you define.
Example
from django.db import models
from django.contrib.auth.models import AbstractUserclass MyUser(AbstractUser):
    address = models.CharField(max_length=30, blank=True)
    birth_date = models.DateField()
In the above example, you will get all the fields of the User model plus the fields we defined here which are address and birth_date
AbstractBaseUser has the authentication functionality only, it has no actual fields, you will supply the fields to use when you subclass.
You also have to tell it what field will represent the username, the fields that are required, and how those users will be managed.
Let's say you want to use email in your authentication, Django normally uses a username in authentication, so how do you change it to use email?
Example
from django.db import models
from django.contrib.auth.models import  AbstractBaseUserclass MyUser(AbstractBaseUser):
    email = models.EmailField(
        verbose_name='email address',
        max_length=255,
        unique=True,
    )
    date_of_birth = models.DateField()
    is_active = models.BooleanField(default=True)
    is_admin = models.BooleanField(default=False)    objects = MyUserManager()    USERNAME_FIELD = 'email'
    REQUIRED_FIELDS = ['date_of_birth']
USERNAME_FIELD is a string describing the name of the field on the user model that is used as the unique identifier.
In the above example, the field email is used as the identifying field.
It is important to note that you can also set email as your unique identifier by using AbstractUser, this can be done by setting username = None and USERNAME_FIELD = 'email'
Project Setup
Start by creating a new Django project along with a users app:
$ mkdir custom-user-model && cd custom-user-model
$ python3 -m venv env
$ source env/bin/activate(env)$ pip install Django==3.2.2
(env)$ django-admin startproject customeUsesr.
(env)$ python manage.py startapp account
Feel free to swap out virtualenv and Pip for Poetry or Pipenv. For more, review Modern Python Environments.
DO NOT apply the migrations. Remember: You must create the custom User model before you apply your first migration.
Add the new app to the INSTALLED_APPS list in settings.py:
1)first comment in installed_apps this line'django.contrib.admin',
INSTALLED_APPS = [
    #'django.contrib.admin',
    'django.contrib.auth',
    'django.contrib.contenttypes',
    'django.contrib.sessions',
    'django.contrib.messages',
    'django.contrib.staticfiles',
    'account',
]
2)second comment in urls file path(‘admin/’, admin.site.urls)
from django.contrib import admin
from django.urls import pathurlpatterns = [
   #path('admin/', admin.site.urls),
]
3)open the account folder and open the file Models.py
from django.db import models
from django.contrib.auth.models import AbstractUser
from django.utils.translation import ugettext_lazy as _# Create your models here.class User(AbstractUser):
username = models.CharField(max_length=30, unique=True)
email = models.EmailField(_('email address'), max_length=254,unique=True, null=True, blank=True)
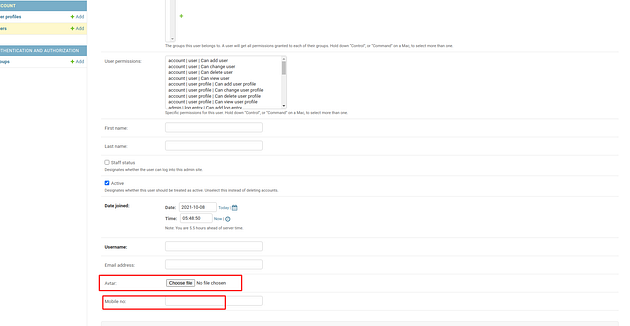
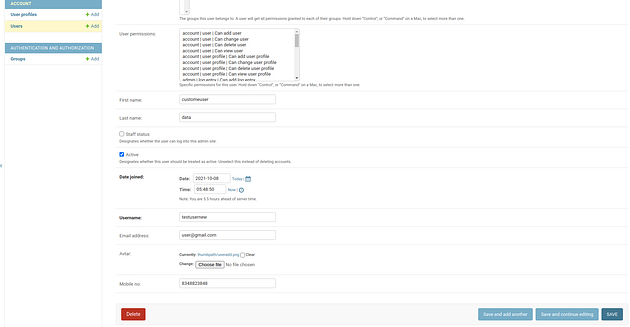
avtar = models.ImageField(upload_to='thumbpath', blank=True)
mobile_no = models.CharField(max_lenght=15) class Meta(AbstractUser.Meta):
swappable = 'AUTH_USER_MODEL'
Settings
Add the following line to the settings.py file so that Django knows to use the new User class:
AUTH_USER_MODEL = 'account.User'
swappable = 'AUTH_USER_MODEL'
Now, you can create and apply the migrations, which will create a new database that uses the custom User model.
(env)$ python manage.py makemigrations
(env)$ python manage.py migrate
Then now uncomment the INSTALLED_APPS list in settings.pyUncomment in installed_apps this line'django.contrib.admin',
INSTALLED_APPS = [
    'django.contrib.admin',
    'django.contrib.auth',
    'django.contrib.contenttypes',
    'django.contrib.sessions',
    'django.contrib.messages',
    'django.contrib.staticfiles',
    'account',
]
second comment in urls file path(‘admin/’, admin.site.urls)
from django.contrib import admin
from django.urls import pathurlpatterns = [
   path('admin/', admin.site.urls),
]
* create a superuser.
(env)$ python manage.py createsuperuserEmail address: test@test.com
Password:
Password (again):
Superuser created successfully.
*then later open /account/admin.py register user model
from django.contrib import admin
from .models import User, UserProfile# Register your models here.
admin.site.register(User)
Conclusion
In this post, we looked at how to create a custom User model
You can find the final code for both options, AbstractUser and AbstractBaseUser, in the django-custom-user-model repo.
Let’s Get in Touch! Follow me on:
\>Instagram: @rajput_gajanan_07.
\>GitHub: @gajanan0707
\>Linkedin: Gajanan Rajput